Glue down vinyl plank flooring has its perks over other options. However, it comes with its own set of problems.
It is better to read about problems associated with glue down vinyl plank flooring before installing it at your home, office, or business. This guide mentions all the problems you may face after installing glue down vinyl plank flooring.

Common Problems with Glue Down Vinyl Plank Flooring and Their Solutions
1. Discoloration and Stains on Vinyl Flooring
Vinyl plank flooring, either glue down or floating is prone to fading and discoloration over time and due to stains and spills.
Solution
- Wipe the spill instantly to avoid stains.
- Use mild floor cleaners or homemade solutions to clean dry stains.
- You can use water & vinegar solution, baking soda paste, vinegar, dish soap, & isopropyl alcohol to clean vinyl floors.
2. Accidental Scratches on Vinyl Flooring
Scratches and spots can come up due to multiple reasons, like your child scratching toys, pet paws, or dragging furniture. It is better to remove the scratches instantly; otherwise, you’ll have to replace the entire plank.

Solution
- Add ½ cup of mild (ammonia-free) dishwashing soap in a bucket of warm water.
- Damp a sponge and clean it to remove dust or debris. You can also vacuum to remove dust from the scratched area.
- Take medium-grit sandpaper and scrub the scratched spots gently. It will eliminate scratches by leveling the floor.
- Take finer sandpaper and rub the entire plank gently with scratches.
- Grab your car polish or compound and apply a little on a microfiber cloth. Gently rub it over the sanded area.
- Let it sit for 3-5 minutes, and then wipe it with a clean microfiber cloth.
- Repeat the procedure if the scratch is still there.
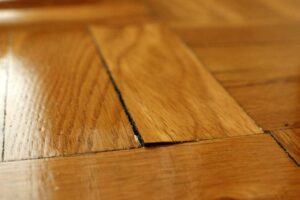
3. Peeling and Cracking of Vinyl Floor
Glue-down vinyl plank flooring usually lasts 15-20 years with moderate usage. However, high-traffic and frequently washed areas can start peeling sooner than expected.
Over time, it leads to dirt accumulation, forcing the planks to swell up and even tear in places. Hence, it is critical to repair/replace such planks.
Solution
- Place aluminum foil or cotton cloth over the cracked/peeled planks and iron them at a medium setting to soften the glue. Softened glue is easier to manage than hardened.
- Apply more glue under the peeled corners; don’t apply too much glue, as it can create ripples.
- Use a rolling pin to press the edges of the repaired plank. It will push out extra glue; wipe it with a warm cloth.
- Place a cloth or wax paper over the repaired plank and put some weight like a book or heavy box. Do not use furniture to put wait.
- You can also replace the plank after heating the glue.
4. Health Concerns/Toxic Compounds & VOCs
You may hear that vinyl floors are bad for your health because they emit VOCs like toxic phthalates, lead, cadmium, and brominated flame retardants. This is true, but only for floors made from reprocessed plastic. Such toxins can cause serious health problems like asthma, cancer, and kidney and lung issues.
Solution
This problem is mostly associated with old vinyl flooring. Major retailers only sell vinyl free from such toxins. You can ask the supplier about certifications and health concerns. If you are moving to a house with old vinyl flooring, ask the landlord or current owner before buying.
Installation Related Problems with Glue Down Vinyl Flooring
Many people prefer glue-down vinyl flooring because it is easier to install than other floor types. However, improper DIY installation or hiring an inexperienced contractor can lead to various installation issues.

1. Dimensional Instabilities, Curling and Coupling
Glue-down vinyl flooring faces dimensional instabilities, curling, cupping, and other issues due to excessive moisture in the room and subfloor. The humidity isn’t suitable for gluing down vinyl planks as it will decrease the efficiency of adhesive compounds and lead to the curling and cupping of the planks. Due to dimensional instabilities, the durability of the vinyl flooring decreases.
Solution
- Consult with a flooring expert before buying vinyl flooring.
- For kitchens, vinyl flooring with maximum heat resistance is best. For washrooms, one with maximum water resistance is preferred.
- You must also check the subflooring-vinyl compatibility before installing vinyl flooring.
2. Peaking of Vinyl Planks
Peaking occurs two planks squash against each other and then lift at the joints. It happens when there is a lack of space between the planks. If you don’t leave a little space during installation for contraction and expansion of planks, peaking will happen after some time. Peaking has some other causes also, including moisture seepage into the joints and sunlight exposure.
Solution
- Leave ¼ inch gap at the walls for expansion. You can use spacers against the walls to establish this expansion gap. Here is an excellent guide to help you install vinyl flooring.
- If you’ve not left this space during installation, you can fix it by trimming ¼ inches of planks along the wall. It will create an expansion room.
- Place some heavy objects on peaked planks; it usually takes 3-4 days before planks return to their original shape.
3. Warping of the Glue Down Vinyl Planks
Warping happens when the vinyl tiles and planks expand due to a temperature change. During the installation process, warping of the glue-down vinyl planks may occur due to direct sun exposure and water spillage. If you don’t immediately clean up the water spillage, it will seep down into the floor and cause warping.
Solution
- Make sure you don’t let any liquids spill on planks during installation.
- Always leave gaps against the walls for expansion.
4. Mold and Mildew Growth
Another common issue you can face with vinyl planks flooring is the growth of molds and mildews. It happens due to high moisture content during installation or water spillage.
Solution
- Find the source of moisture.
- Seal the substrate of your vinyl flooring if it is causing moisture.
- Take help from a professional if you can’t find the moisture source.
Vinyl Flooring Maintenance Tips
- Regular maintenance helps avoid stains, discoloration, warping, and cracking. Here are a few tips to help you keep your glue down vinyl plank flooring new for a long time.
- Clean vinyl floors regularly with the right tools. Dry mopping and vacuuming twice a week prevent dust buildup.
- Place a doormat at every entrance and leave shoes outside.
- Do not apply liquid or paste wax to non-wax vinyl plank floors; use a commercially compatible sealant.
- Let the floor air-dry after a cleaning session.
- Do not drag heavy furniture on vinyl floors to prevent scratches. Moreover, use leg shoes instead of additional planks as a base.
Frequently Asked Questions
Why do you need an expansion gap for glue-down vinyl flooring?
Vinyl flooring is climate-sensitive, and due to temperature fluctuations, it expands or contracts. So, to glue down vinyl flooring, you have to leave ¼ inches expansion gap. This gap will allow the planks to expand when needed; otherwise, your vinyl flooring will warp or buckle in the middle.
What happens if you glue down a floating floor?
Glue down a floating floor makes it more durable as it attaches the floating floor directly to a subfloor. But, floating floors move or expand with temperature. It will get damaged if you glue down the floating floor during expansion. You can glue down the floating floor by leaving a proper expansion gap.
What is the recommended thickness for vinyl plank flooring?
In common households, 12 mil vinyl plank flooring is suitable. But if your floor has to face heavy foot traffic or you have pets or children in your home, then 20 mil thickness vinyl planks will be better. For commercial buildings, 28 mil thickness planks will be suitable.

Leave a Reply